


Cyclops Speedo Sewing Pattern
Reliable shipping
Flexible returns
Supplies:
Step 1: Prepare Your Fabric
- Prewash fabric
- Let the fabric relax on the table for 15-30 minutes before cutting
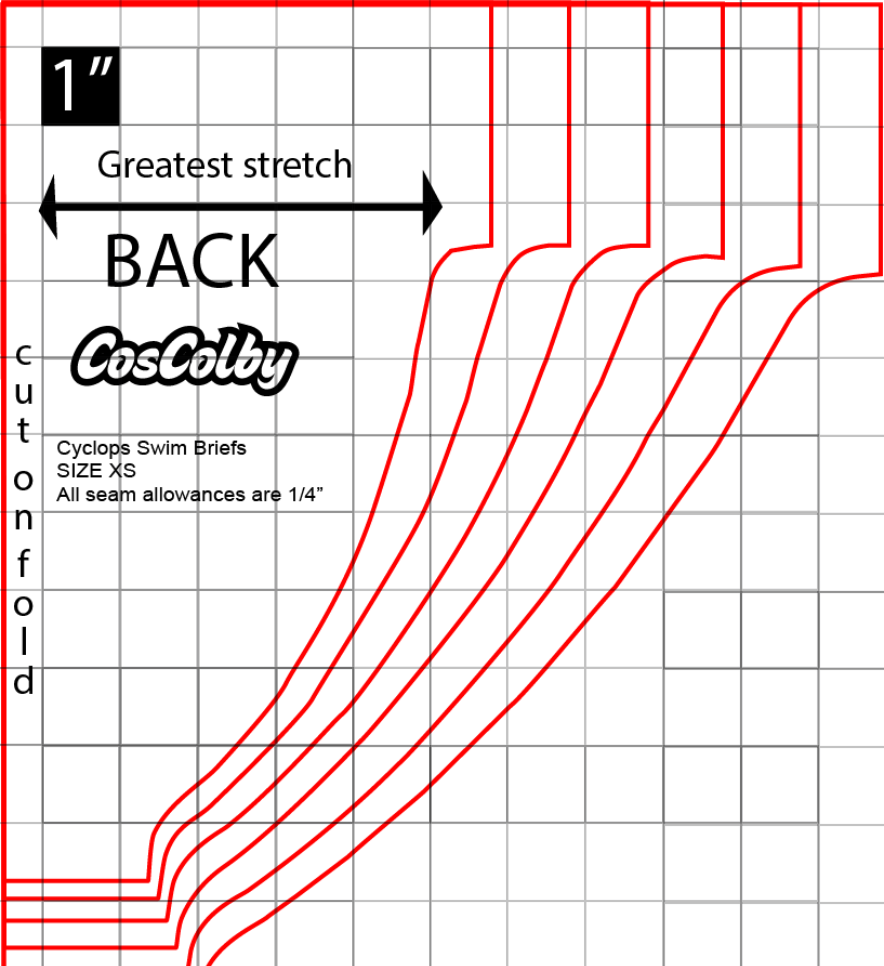
- Fold fabric in half with right sides together
- Ensure the greatest stretch goes in the direction marked on the pattern
Step 2: Cut Your Pieces
- Pin or weight pattern pieces to fabric
- Don’t forget also to weigh the rest of the fabric yard so it doesn’t pull
- Iron/press so it’s flat and even
- Trace the pattern of X onto Wonder-Under (it should be backwards)
- Cut the general outline of X, leaving about a ½ inch border.
- Cut notches as marked on the pattern to help align X on the speedo
- Press (no steam) onto the wrong side of the blue fabric for 6-8 seconds. This will vary based on fabrics
- Cut out X and place the wrong side of the blue X to the right side of the yellow front piece, lining up notches
- Place a pressing cloth over the blue X and press with an iron for 15 seconds.
- Remove pressing cloth and iron out any excess moisture, and let cool
Alt: You can use basting spray to adhere fabric, then use a water soluble iron-on stabilizer onto the back of the YELLOW fabric
Step 3: Appliqué
- Set stitch length to 1, width to 1.5, and standard tension for your machine (mine's at 4)
- Zig-zag stitch along the edge of the blue X
- When going around corners: stitch just past where you'll turn the seam, backstitch, lift up the presser foot (Make sure the needle is down into the fabric before you turn!), stitch forward a couple of seams, backstitch, then continue
Step 4: Front Panel Assembly
- Fold front piece in half, right sides together
- Stitch center front seam with zig-zag stitch, then top stitch down:
- Start with 1/4" seam at the bottom
- Gradually decrease to 1/8" at top
- Leave 1/2" thread tail at top
Step 5: Side Seams
- Match front and back pieces at side seams
- Align notches and baste with stitch or tape
- Zig zag Stitch sides with right sides together at 1/4" , then top stitch seam allowance down with zig zag stitch set at 0
Step 6: Crotch Seam
- Match front and back crotch seams
- Stitch with right sides together
- Then top-stitch the seam allowance down, facing the back piece.
Step 7: Elastic Installation
- Cut the elastic to the length needed for waist
- Divide the elastic into 4 equal sections, mark with pins
- Divide the swimsuit waist into 4 equal sections
- Match pins and attach elastic while stretching (Make sure you pre-stretch your elastic and give it time to settle again - around 10 min)
- With a straight stitch at length of 4 and tension at 3, baste the waistband to the wrong side of the fabric, fold over the waistband inside so the elastic is not visible.
- Pin the elastic and mark on the front where the edge of the elastic is underneath. Top Stitch down along edge of elastic with zig zag stitch width of .5
- Repeat the same process for each leg opening
- Start elastic at the side seam area
- Stretch elastic while sewing
Common Beginner Mistakes to Watch For
- Not stretching the elastic enough while attaching
- Forgetting to use ballpoint needle
- Cutting without washing fabric or letting fabric relax
- Using wrong direction of stretch